Settings & Tutorials
In order to get started with the plottiX products right away, we have summarized some helpful information for you.
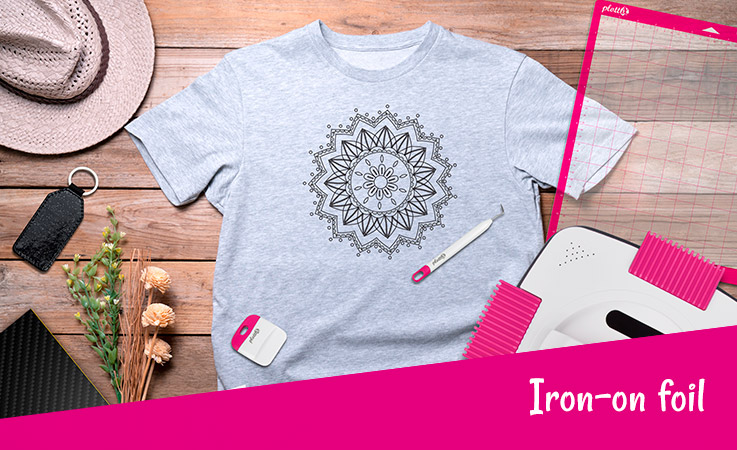


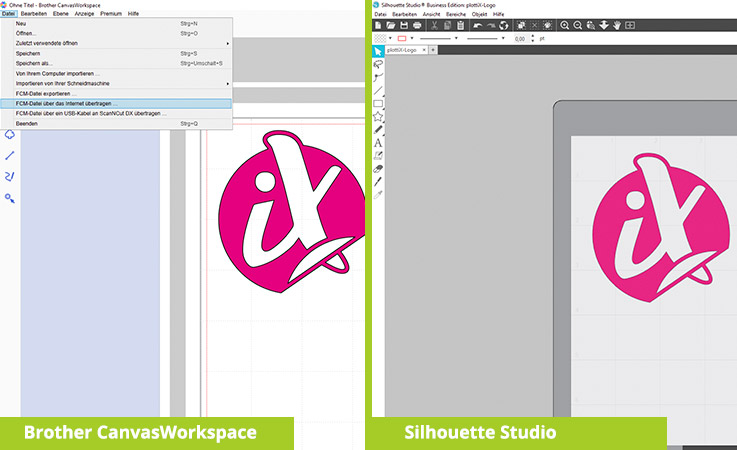
1. Create your design on the computer using your design software.
Important: Always mirror the text before cutting! Otherwise, it will be ironed on later on the other side.
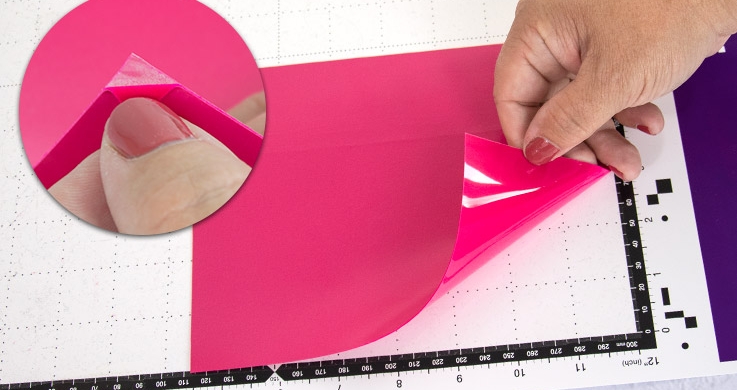 2. Place the iron-on foil in your cutting plotter with the transparent plastic side facing down. Make sure you have the correct settings for your device.
A tip to find the right side: Peel off the foil a little at one corner.
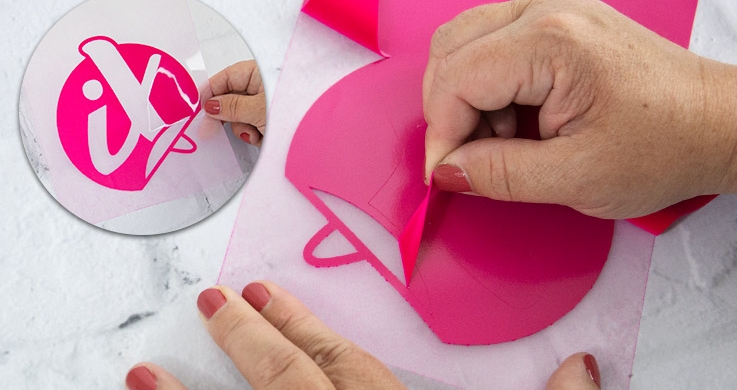
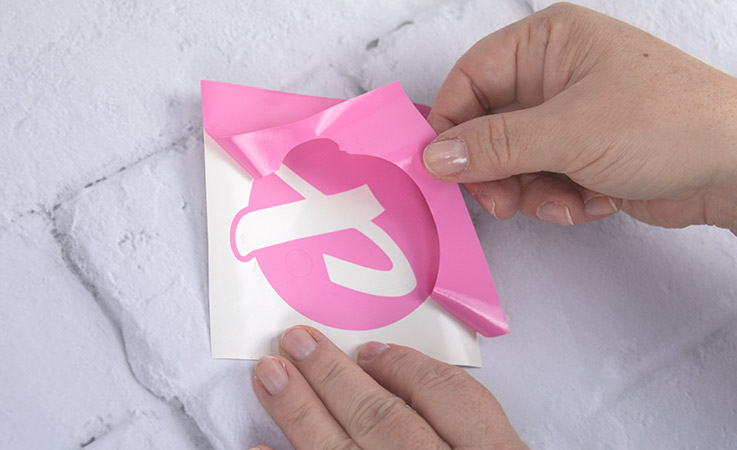
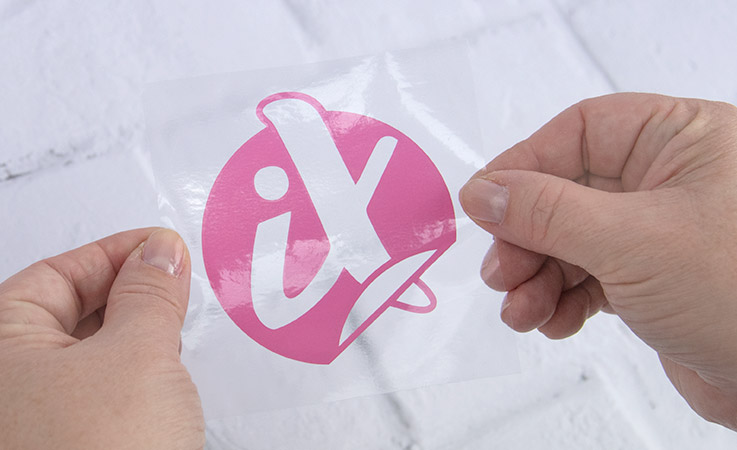
3. Once your design is cut, you can weed it.
Remove all parts not belonging to the motif from the transparent carrier foil. Your design remains.
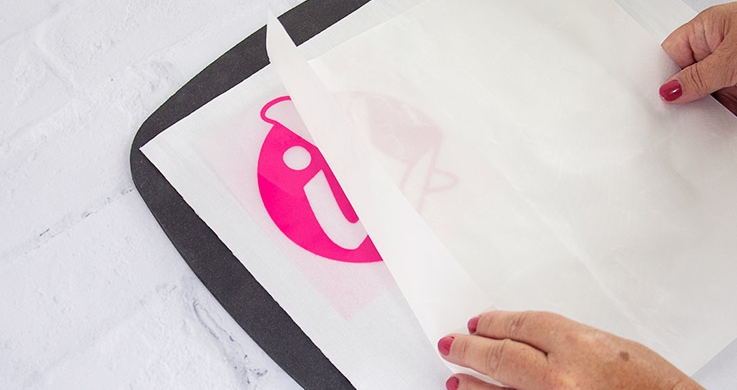
4. Now place your design on your textile. The transparent carrier foil points upwards.
To protect your press you can use our Heat-resistant antistick sheet. Alternatively you can use a sheet of baking paper.
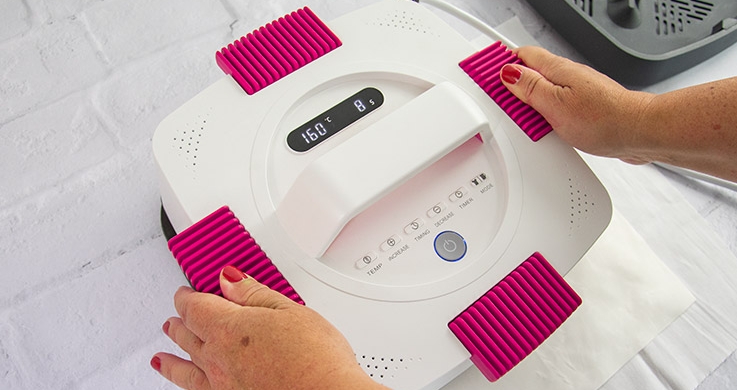
5. Set the temperature and time for your transfer press. Then press with your preheated transfer press on your design.
Alternatively you can use an iron.
Repeat this step until the complete foil is ironed on.
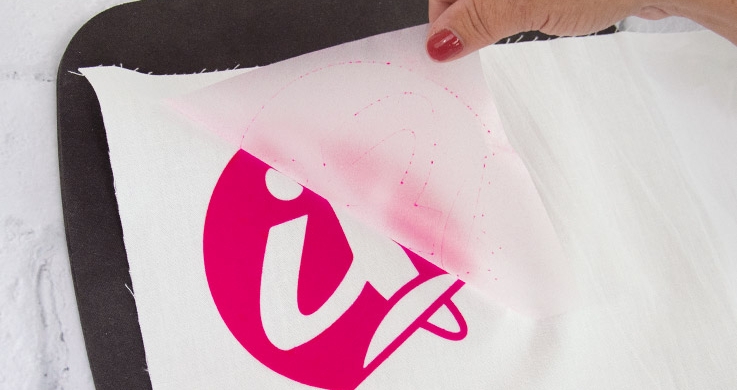
6. Depending on the iron-on foil, you can finally peel the transparent carrier foil cold or warm. Please pay attention to the guidelines for your foil.
Tip for a longer durability: Wash your design best at max. 40 degrees inside out.
Blade Settings
| Device | Blade | Contact Pressure |
|---|---|---|
| Silhouette | 2 | 4 |
| Brother CM-Series | 1 | 0 |
| Brother DX-Series* | Auto | Auto |
| When using a Cricut cutting plotter ** | 113 | Standard |
Please note that the contact pressure may have to be increased depending on the wear of the blade.
*Enable half cut function
** Multicut OFF – Blade type: Premium Fine-Point-Blade
Instructions
- Iron on: pre-press hot for approx. 5 seconds
- Place motif (cover with baking paper if necessary)
- Press firmly for approx. 12 seconds at 150 degrees
- Peel off carrier hot or cold
- Washable up to 60 degrees
- Suitable textiles: cotton, polyester, mixed fabric
Blade Settings
| Device | Blade | Contact Pressure |
|---|---|---|
| Silhouette | 2 | 4 |
| Brother CM-Series | 1 | 0 |
| Brother DX-Series* | Auto | Auto |
| When using a Cricut cutting plotter ** | 113 | Standard |
Please note that the contact pressure may have to be increased depending on the wear of the blade.
*Enable half cut function
** Multicut OFF – Blade type: Premium Fine-Point-Blade
Instructions
- Iron on: pre-press hot for approx. 5 seconds
- Place motif (cover with baking paper if necessary)
- Press firmly for approx. 12 seconds at 150 degrees
- Peel off carrier hot or cold
- Washable up to 60 degrees
Blade Settings
| Device | Blade | Contact Pressure |
|---|---|---|
| Silhouette | 2 | 4 |
| Brother CM-Series | 1 | 0 |
| Brother DX-Series* | Auto | Auto |
| When using a Cricut cutting plotter ** | 113 | Standard |
Please note that the contact pressure may have to be increased depending on the wear of the blade.
*Enable half cut function
** Multicut OFF – Blade type: Premium Fine-Point-Blade
Instructions
- Iron on: pre-press hot for approx. 5 seconds
- Place motif (cover with baking paper if necessary)
- Press firmly for approx. 15 seconds at 115 degrees
- Peel off carrier cold
- Washable up to 40 degrees
- Suitable textiles: Nylon and other coated textiles
Blade Settings
| Device | Blade | Contact Pressure |
|---|---|---|
| Silhouette | 3 | 33 |
| Brother CM-Series | 2 | 0 |
| Brother DX-Series* | Auto | Auto |
| When using a Cricut cutting plotter ** | 150 | Standard |
Please note that the contact pressure may have to be increased depending on the wear of the blade.
*Enable half cut function
** Multicut OFF – Blade type: Premium Fine-Point-Blade
Instructions
- Iron on: pre-press hot for approx. 5 seconds
- Place motif (cover with baking paper if necessary)
- Press firmly for approx. 15-17 seconds at 160-170 degrees
- Peel off carrier cold
- Washable up to 60 degrees
- Suitable textiles: cotton, polyester, mixed fabric
Blade Settings
| Device | Blade | Contact Pressure |
|---|---|---|
| Silhouette | 3 | 33 |
| Brother CM-Series | 2 | 0 |
| Brother DX-Series* | Auto | Auto |
| When using a Cricut cutting plotter ** | 150 | Standard |
Please note that the contact pressure may have to be increased depending on the wear of the blade.
*Enable half cut function
Instructions
- Iron on: pre-press hot for approx. 5 seconds
- Place motif (cover with baking paper if necessary)
- Press firmly for approx. 15 seconds at 175 degrees
- Peel off carrier cold
- Washable up to 40 degrees – avoid dryers
- Ironable
Blade Settings
| Device | Blade | Contact Pressure |
|---|---|---|
| Silhouette | 2 | 33 |
| Brother CM-Series | 2 | 0 |
| Brother DX-Series* | Auto | Auto |
| When using a Cricut cutting plotter ** | 135 | Standard |
Please note that the contact pressure may have to be increased depending on the wear of the blade.
*Enable half cut function
** Multicut OFF – Blade type: Premium Fine-Point-Blade
Instructions
- Iron on: pre-press hot for approx. 5 seconds
- Place motif (cover with baking paper if necessary)
- Press firmly for approx. 15-17 seconds at 160-170 degrees
- Peel off carrier cold
- Washable up to 60 degrees
- Suitable textiles: cotton, polyester, mixed fabric
Blade Settings
| Device | Blade | Contact Pressure |
|---|---|---|
| Silhouette | 3 | 33 |
| Brother CM-Series | 1 | 0 |
| Brother DX-Series* | Auto | +2 |
| When using a Cricut cutting plotter ** | 150 | Standard |
Please note that the contact pressure may have to be increased depending on the wear of the blade.
*Enable half cut function
** Multicut OFF – Blade type: Premium Fine-Point-Blade
Instructions
- Iron on: pre-press hot for approx. 5 seconds
- Place motif (cover with baking paper if necessary)
- Press firmly for approx. 10 seconds at 160-170 degrees
- Peel off carrier cold
- Washable up to 40 degrees
- Suitable textiles: cotton, polyester, mixed fabric
Blade Settings
| Device | Blade | Contact Pressure |
|---|---|---|
| Silhouette | 3 | 33 |
| Brother CM-Series | 2 | 0 |
| Brother DX-Series* | Auto | Auto |
| When using a Cricut cutting plotter ** | 150 | Standard |
Please note that the contact pressure may have to be increased depending on the wear of the blade.
*Enable half cut function
** Multicut OFF – Blade type: Premium Fine-Point-Blade
Instructions
- Iron on: pre-press hot for approx. 5 seconds
- Place motif (cover with baking paper if necessary)
- Press firmly for approx. 10 seconds at 155 degrees
- Peel off carrier hot
- Washable up to 40 degrees
- Suitable textiles: cotton, polyester, mixed fabric
Blade Settings
| Device | Blade | Contact Pressure |
|---|---|---|
| Silhouette | 2 | 33 |
| Brother CM-Series | 1 | 0 |
| Brother DX-Series* | Auto | Auto |
| When using a Cricut cutting plotter ** | 113 | Standard |
Please note that the contact pressure may have to be increased depending on the wear of the blade.
*Enable half cut function
** Multicut OFF – Blade type: Premium Fine-Point-Blade
Instructions
- Iron on: pre-press hot for approx. 5 seconds
- Place motif (cover with baking paper if necessary)
- Press firmly for approx. 20 seconds at 170 degrees
- Peel off carrier hot or cold
- Washable up to 40 degrees (with mild detergent)
- Be careful when weeding, as the foil is very stretchy
Blade Settings
| Device | Blade | Contact Pressure |
|---|---|---|
| Silhouette | 1 | 10 |
| Brother CM-Series | 1 | 0 |
| Brother DX-Series* | Auto | Auto |
| When using a Cricut cutting plotter ** | 113 | Standard |
Please note that the contact pressure may have to be increased depending on the wear of the blade.
*Enable half cut function
** Multicut OFF – Blade type: Premium Fine-Point-Blade
Instructions
- Iron on: pre-press hot for approx. 5 seconds
- Place motif (cover with baking paper if necessary)
- Press firmly for approx. 15 seconds at 150 degrees
- Peel off carrier cold
- Washable up to 60 degrees
- Suitable textiles: cotton, polyester, mixed fabric
Blade Settings
| Device | Blade | Contact Pressure |
|---|---|---|
| Silhouette | 1 | 4 |
| Brother CM-Series | 1 | 0 |
| Brother DX-Series* | Auto | Auto |
| When using a Cricut cutting plotter ** | 113 | Standard |
Please note that the contact pressure may have to be increased depending on the wear of the blade.
*Enable half cut function
** Multicut OFF – Blade type: Premium Fine-Point-Blade
Instructions
- Iron on: pre-press hot for approx. 5 seconds
- Place motif (cover with baking paper if necessary)
- Press firmly for approx. 17 seconds at 165 degrees
- Peel off carrier hot or cold
- Washable up to 60 degrees
- Suitable textiles: cotton, polyester, mixed fabric
Blade Settings
| Device | Blade | Contact Pressure |
|---|---|---|
| Silhouette | 2 | 4 |
| Brother CM-Series | 1 | 0 |
| Brother DX-Series* | Auto | Auto |
| When using a Cricut cutting plotter ** | 113 | Standard |
Please note that the contact pressure may have to be increased depending on the wear of the blade.
*Enable half cut function
** Multicut OFF – Blade type: Premium Fine-Point-Blade
Instructions
- Iron on: pre-press hot for approx. 5 seconds
- Place motif (cover with baking paper if necessary)
- 140°C &10s press with carrier, then remove carrier and press again for 10s
- Peel off carrier hot or cold
- Washable up to 40 degrees
- Suitable textiles: cotton, polyester, mixed fabric
Blade Settings Puffy V2
| Device | Blade | Contact Pressure |
|---|---|---|
| Silhouette | 2 | 4 |
| Brother CM-Series | 1 | -2 |
| Brother DX-Series* | Auto | Auto |
| When using a Cricut cutting plotter ** | 113 | Standard |
Please note that the contact pressure may have to be increased depending on the wear of the blade.
*Enable half cut function
** Multicut OFF – Blade type: Premium Fine-Point-Blade
Blade Settings
| Device | Blade | Contact Pressure |
|---|---|---|
| Silhouette | 2 | 4 |
| Brother CM-Series | 1 | 0 |
| Brother DX-Series* | Auto | Auto |
| When using a Cricut cutting plotter ** | 113 | Standard |
Please note that the contact pressure may have to be increased depending on the wear of the blade.
*Enable half cut function
** Multicut OFF – Blade type: Premium Fine-Point-Blade
Instructions
- Iron on: pre-press hot for approx. 5 seconds
- Place motif (cover with baking paper if necessary)
- Press firmly for approx. 17 seconds at 165 degrees
- Peel off carrier hot or cold
- Washable up to 60 degrees
- Suitable textiles: cotton, polyester, mixed fabric
Blade Settings
| Device | Blade | Contact Pressure |
|---|---|---|
| Silhouette | 2 | 4 |
| Brother CM-Series | 1 | -1 |
| Brother DX-Series* | Auto | Auto |
| When using a Cricut cutting plotter ** | 113 | Standard |
Please note that the contact pressure may have to be increased depending on the wear of the blade.
*Enable half cut function
** Multicut OFF – Blade type: Premium Fine-Point-Blade
Instructions
- Iron on: pre-press hot for approx. 5 seconds
- Place motif (cover with baking paper if necessary)
- Press firmly for approx. 12 seconds at 150 degrees
- Peel off carrier hot or cold
- Washable up to 40 degrees – Wash and iron your textile inside out
- Suitable textiles: cotton, polyester, mixed fabric
Blade Settings
| Device | Blade | Contact Pressure |
|---|---|---|
| Silhouette | 2 | 4 |
| Brother CM-Series | 1 | -1 |
| Brother DX-Series* | Auto | Auto |
| When using a Cricut cutting plotter ** | 113 | Standard |
Please note that the contact pressure may have to be increased depending on the wear of the blade.
*Enable half cut function
** Multicut OFF – Blade type: Premium Fine-Point-Blade
Instructions
- Iron on: pre-press hot for approx. 5 seconds
- Place motif (cover with baking paper if necessary)
- Press firmly for approx. 12 seconds at 150 degrees
- Peel off carrier hot
- Washable up to 40 degrees – Wash and iron your textile inside out
- Suitable textiles: cotton, polyester, mixed fabric
Blade Settings
| Device | Blade | Contact Pressure |
|---|---|---|
| Silhouette | 2 | 8 |
| Brother CM-Series | 1 | 0 |
| Brother DX-Series* | Auto | Auto |
| When using a Cricut cutting plotter ** | 113 | Standard |
Please note that the contact pressure may have to be increased depending on the wear of the blade.
*Enable half cut function
** Multicut OFF – Blade type: Premium Fine-Point-Blade
Instructions
- Iron on: pre-press hot for approx. 5 seconds
- Place motif (cover with baking paper if necessary)
- Temperature & Press time
130 °C, 5 sec. / 150 °C, 4 sec. / 160 °C, 3 sec. - Peel off warm – Berry and Neon Colors peel off tepid
- Washable up to 60 degrees (with mild detergent)
Blade Settings
| Device | Blade | Contact Pressure |
|---|---|---|
| Silhouette | 2 | 8 |
| Brother CM-Series | 1 | 0 |
| Brother DX-Series* | Auto | Auto |
| When using a Cricut cutting plotter ** | 113 (Silver)
150 (Gold & Black) |
Standard |
Please note that the contact pressure may have to be increased depending on the wear of the blade.
*Enable half cut function
** Multicut OFF – Blade type: Premium Fine-Point-Blade
Instructions
- Iron on: pre-press hot for approx. 5 seconds
- Place motif (cover with baking paper if necessary)
- Press firmly for approx. 5 seconds at 130 degrees
SpeedFlex Reflective Silver on cotton:
approx. 5 seconds at bei 160 degrees - Peel off hot
- Washable up to 60 degrees (with mild detergent)
Blade Settings
| Device | Blade | Contact Pressure |
|---|---|---|
| Silhouette | 2 | 8 |
| Brother CM-Series | 1 | 0 |
| Brother DX-Series* | Auto | Auto |
| When using a Cricut cutting plotter ** | 113 | Standard |
Please note that the contact pressure may have to be increased depending on the wear of the blade.
*Enable half cut function
** Multicut OFF – Blade type: Premium Fine-Point-Blade
Instructions
- Iron on: pre-press hot for approx. 5 seconds
- Place motif (cover with baking paper if necessary)
- Temperature & press time
130 °C, 5 sec. / 150 °C, 4 sec. / 160 °C, 3 sec. - Peel off carrier hot
- Washable up to 60 degrees (with mild detergent)
Blade Settings
| Device | Blade | Contact Pressure |
|---|---|---|
| Silhouette | 6 | 30 (2 applications) |
| Brother CM-Series | 5 | 3 |
| Brother DX-Series* | Auto | Auto |
| When using a Cricut cutting plotter ** | 165 | More |
Please note that the contact pressure may have to be increased depending on the wear of the blade.
*Enable half cut function
** Multicut OFF – Blade type: Premium Fine-Point-Blade
Instructions
- Iron on: pre-press hot for approx. 5 seconds
- Place motif (cover with baking paper if necessary)
- Press foil for 25 sec. and with 160°C degrees firmly
- Peel off carrier cold
- Your design should not be too delicate – this foil is rather thick.
- Washable up to 60 degrees (with mild detergent)
Blade Settings
| Device | Blade | Contact Pressure |
|---|---|---|
| Silhouette | 2 | 8 |
| Brother CM-Series | 1 | 0 |
| Brother DX-Series* | Auto | Auto |
| When using a Cricut cutting plotter ** | 150 | Standard |
Please note that the contact pressure may have to be increased depending on the wear of the blade.
*Enable half cut function
** Multicut OFF – Blade type: Premium Fine-Point-Blade
Instructions
- Iron on: pre-press hot for approx. 5 seconds
- Place motif (cover with baking paper if necessary)
- Press firmly for approx. 15 seconds at 160 degrees
- Peel off carrier cold
- Washable up to 60 degrees (with mild detergent) – Brillant color only 40 degrees
Blade Settings
| Device | Blade | Contact Pressure |
|---|---|---|
| Silhouette | 2 | 8 |
| Brother CM-Series | 1 | 0 |
| Brother DX-Series* | Auto | Auto |
| When using a Cricut cutting plotter ** | 113 | Standard |
Please note that the contact pressure may have to be increased depending on the wear of the blade.
*Enable half cut function
** Multicut OFF – Blade type: Premium Fine-Point-Blade
Instructions
- Iron on: pre-press hot for approx. 5 seconds
- Place motif (cover with baking paper if necessary)
- Press firmly for approx. 15 seconds at 160 degrees
- Peel off hot
- Washable up to 60 degrees (with mild detergent)
Blade Settings
| Device | Blade | Contact Pressure |
|---|---|---|
| Silhouette | 2 | 8 |
| Brother CM-Series | 1 | 0 |
| Brother DX-Series* | Auto | Auto |
| When using a Cricut cutting plotter ** | 113 | Standard |
Please note that the contact pressure may have to be increased depending on the wear of the blade.
*Enable half cut function
** Multicut OFF – Blade type: Premium Fine-Point-Blade
Instructions
- Iron on: pre-press hot for approx. 5 seconds
- Place motif (cover with baking paper if necessary)
- Press firmly for approx. 15 seconds at 160 degrees
- Peel off hot
- Washable up to 60 degrees (with mild detergent)
Blade Settings
| Device | Blade | Contact Pressure |
|---|---|---|
| Silhouette | 4 | 16 |
| Brother CM-Series | 2 | 0 |
| Brother DX-Series* | Auto | Auto |
| When using a Cricut cutting plotter ** | 230 | Standard |
Please note that the contact pressure may have to be increased depending on the wear of the blade.
*Enable half cut function
** Multicut OFF – Blade type: Premium Fine-Point-Blade
Instructions
- Iron on: prepress hot for approx. 5 seconds
- Place design (cover with baking paper if necessary)
- Approx. 15 seconds at 160 °C
- Peel off transfer material lukewarm (for laser printing, peel off backing material cold)
- Washable up to 40 degrees (wash inside out)
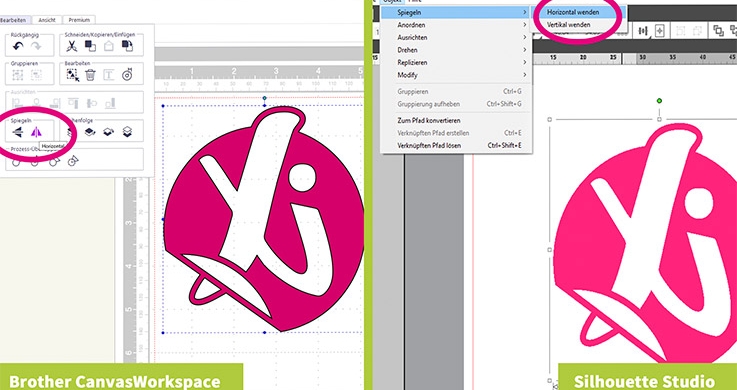
1. Create your design on the computer using your design software.

2. Insert the vinyl foil into your cutting plotter with the carrier paper facing down, the material side facing up. If you use a cutting mat, make sure that it does not stick too strongly. Otherwise the carrier paper cannot be removed without leaving traces. In order to apply your foil bubble-free, smooth the vinyl foil with a squeegee.
Afterwards you can start the plotting process – make sure you have the correct settings for your device.
3. Once your design is cut, you can weed it.
Remove all parts not belonging to the design from the carrier foil. Your design remains.
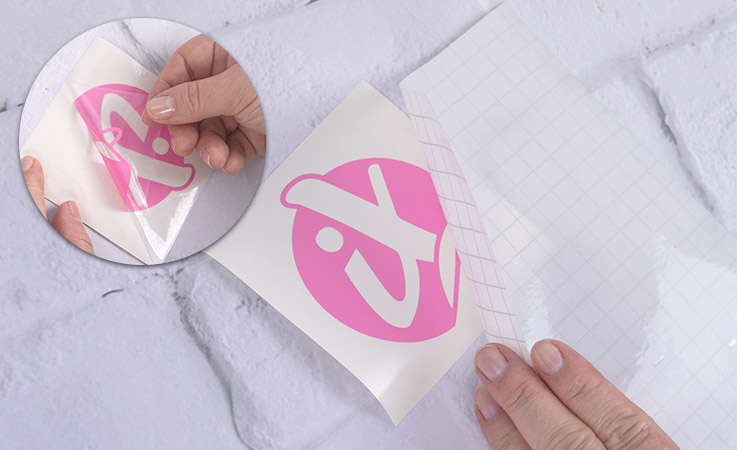
4. Use a transfer foil to transfer your vinyl foil.
Cut it to the right size. Then carefully stick it onto your weeded design. Press the transfer foil firmly onto your vinyl foil with a squeegee. Then you can remove the vinyl foil from the carrier paper using the transfer foil.
5. Now you can transfer your design via transfer foil to a suitable surface. Make sure that your surface is smooth and clean.
Place your design together with the transfer foil on your desired surface and squeegee the design thoroughly onto the surface.

6. At the end you can carefully remove the transfer foil. Get creative and use the vinyl foil for different projects!
Blade settings
| Device | Blade | Contact Pressure |
|---|---|---|
| Silhouette | 1 | 10 |
| Brother CM-Series | 1 | -3 |
| Brother DX-Series* | Auto | Auto |
| When using a Cricut cutting plotter ** | 135 | Less |
Please note that the contact pressure may have to be increased depending on the wear of the blade.
*Enable half cut function
** Multicut OFF – Blade type: Premium Fine-Point-Blade
Blade settings
| Device | Blade | Contact Pressure |
|---|---|---|
| Silhouette | 1 | 10 |
| Brother CM-Series | 1 | -3 |
| Brother DX-Series* | Auto | Auto |
| When using a Cricut cutting plotter ** | 135 | Standard |
Please note that the contact pressure may have to be increased depending on the wear of the blade.
*Enable half cut function
** Multicut OFF – Blade type: Premium Fine-Point-Blade
Blade Settings
| Device | Blade | Contact Pressure | Speed | Repetitions |
|---|---|---|---|---|
| Silhouette | 4 | 28 | 2 | 2 |
| Brother CM-Series | 2-3 | 0 | 1 | – |
| Brother DX-Series* | Auto | Auto | 4 | – |
| When using a Cricut cutting plotter ** | 250 | Standard |
Please note that the contact pressure may have to be increased depending on the wear of the blade.
*Disable half cut function
** Multicut ON (2x) – Blade type: Premium Fine-Point-Blade
Blade settings
| Device | Blade | Contact Pressure |
|---|---|---|
| Silhouette | 4 | 28 |
| Brother CM-Series | 2,5 | 0 |
| Brother DX-Series* | Auto | Auto |
| When using a Cricut cutting plotter ** | 250 | Standard |
Please note that the contact pressure may have to be increased depending on the wear of the blade.
*Enable half cut function
** Multicut OFF – Blade type: Premium Fine-Point-Blade
Staticfoil Blade Settings
Pick & Go – important features and all settings for your device can be found in the overview below.
Blade settings
| Device | Blade | Contact Pressure |
|---|---|---|
| Silhouette | 1 | 15 |
| Brother CM-Series | 1 | -2 |
| Brother DX-Series* | Auto | Auto |
| When using a Cricut cutting plotter ** | 100 | Standard |
Please note that the contact pressure may have to be increased depending on the wear of the blade.
*Enable half cut function
** Multicut OFF – Blade type: Premium Fine-Point-Blade